How to mitmproxy part 1: Inspecting Android Network Traffic with mitmproxy
When developing an Android application with network activity such as requesting a resource to a remote endpoint, I usually like to inspect the client requests and the server responses to identify what is being sent and given. There are several ways I know to inspect the network traffic in an Android application:
- Adding interceptor on the client and log the request and response to the Logcat.
- Using 3rd party library like chucker to do the job. Under the hood, chucker also use an interceptor, but they provide a friendly GUI page and some additional features to ease you to inspect the traffic instead of reading it from the Logcat.
- Using a local proxy server such as Charles, Fiddler, and the one that I am going to talk about mitmproxy.
I prefer to use the local proxy server. Why? It usually comes with a lot of debugging capability, such as modifying responses, throttling, etc to test several cases without recompiling the app and making me less dependent to the back-end. There are some pros and cons of course, among the method you choose. For example, I know it's a lot easier to implement the 3rd party library to do the job, and you don't have to set up the client's network certificate and fire up the proxy server. But I don't like to switch back and forth between the app process to see the network traffic log. I prefer to see them side by side.
But why mitmproxy instead of the other? Well, because it's free and comes with tons of features. The biggest selling point for me is that mitmproxy lets you create a Python script. They call it an Addon. It lets you listen to http/https events and do your magic there, such as modifying the request/response headers, payload, etc without pausing it which usually ends up with connection timeout like most of the local proxy server app do. We will not talk about the Addon. I will save it for another post. Ok, let's dive into the tutorial.
What is Proxy Server
First, what is a proxy server? Taken from Wikipedia page, a proxy server is a server application or appliance that acts as an intermediary for requests from clients seeking resources from servers that provide those resources.
A proxy server is widely known for its function to hide the client's true identity (IP address, location, etc) from the server. If you ever watched a movie where a hacker hacks a computer system and the security team says, "We can't locate him. He must be hiding behind a proxy" that means the hacker is using a proxy server to cover up his identity. perhaps this illustration will give you a clear picture of a proxy server

💡 There is also another type of proxy called Reverse proxy. This type of proxy is usually used as a load balancer on the server-side.
What Is mitmproxy
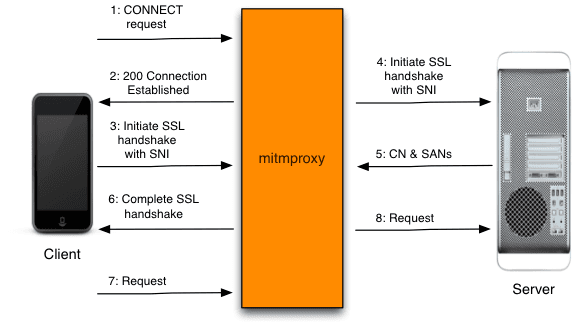
mitmproxy is a free and open-source interactive HTTPS proxy as so it says on their website. mitm stands for man-in-the-middle. It is referring to the famous man-in-the-middle attack. A website using the http protocol is prone to this attack because the data sent/receive are not encrypted. To secure the data, it needs to use a secure protocol such as https.
mitmproxy acts as a middleman where the client thinks it's communicating with the server and the server think it's communicating with the client. Where in fact the data sent/receive is passed through the mitmproxy server first—That's why we can inspect the network traffic.
You can read the full detail on their documentation page.
Installing mitmproxy
macOS
Installation on macOS is pretty straight forward using Homebrew. Type this on the terminal:
brew install mitmproxy
Linux
Unfortunately, installation on Linux OS requires a bit more steps:
- Download the binary from their website.
- Extract the file to a folder.
- Add the folder path to your PATH environment variable.
- Restart the terminal.
Verify the installation by typing this on the terminal to check the binary version:
mitmproxy --version
Starting Up the Proxy Server
mitmproxy comes with 3 types of binaries:
- mitmproxy: An interactive TUI.
- mitmweb: Browser-based GUI.
- mitmpdump: Give you plain and simple terminal output.
The three binaries have the same functions but, how the data represented is different. I am going to go with the one I usually used, mitmweb. If you prefer the terminal, I recommend the mitmproxy command.
To fire up the proxy server, you only need to type this command:
mitmweb
The program will give you an output of 2 IP addresses like the picture below
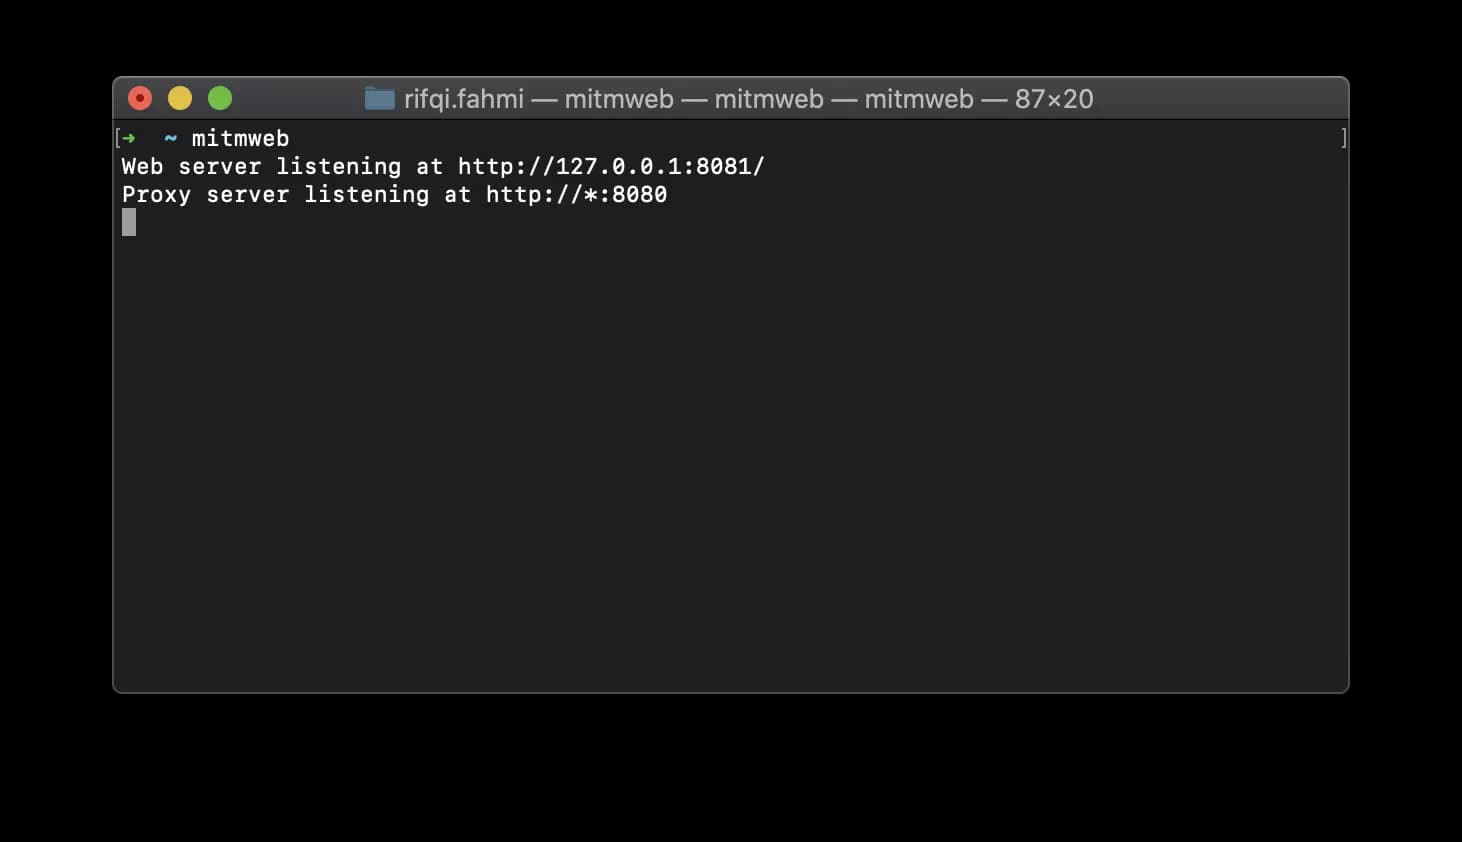
The first address is usually opened in your default browser when you type the mitmweb command. If it's not opened, you can visit the URL on your browser. It is the page where you will inspect the network traffic. We will see below how to navigate it.
The second address is the local proxy server IP address. The wildcard * indicates whatever value is your current IP address on the network. You need to find out your own private IP address (Google it) for your machine as we will use it later to connect the Android client to the proxy server. For example, if my current IP address is 192.168.1.100, the proxy server address would be 192.168.1.100:8080.
Connecting Android Emulator to the Proxy Server
Before we continue to set up the Android client, I want to let you know that since there are some changes to Trusted Certificate Authorities in Android Nougat you can only inspect network traffic for debug-type application with user-trusted-added CAs.
Setting up the Manifest File
To allow an app to trust custom CAs only for local debugging, you need to make an adjustment in your manifest file. I am going to use my side project android-mvvm-coroutine as an example:
<?xml version="1.0" encoding="utf-8"?>
<manifest ... >
    <application android:networkSecurityConfig="@xml/network_security_config"
      ... >
            ...
    </application>
</manifest>
<network-security-config>
      <debug-overrides>
           <trust-anchors>
                <!-- Trust user added CAs while debuggable only -->
                <certificates src="user" />
           </trust-anchors>
      </debug-overrides>
 </network-security-config>
Connecting to the Proxy Server
There are two ways you can connect to the proxy server if you are using the Android Emulator:
- Through the emulator proxy config setting (Emulator only).
- Through WiFi current network setting.
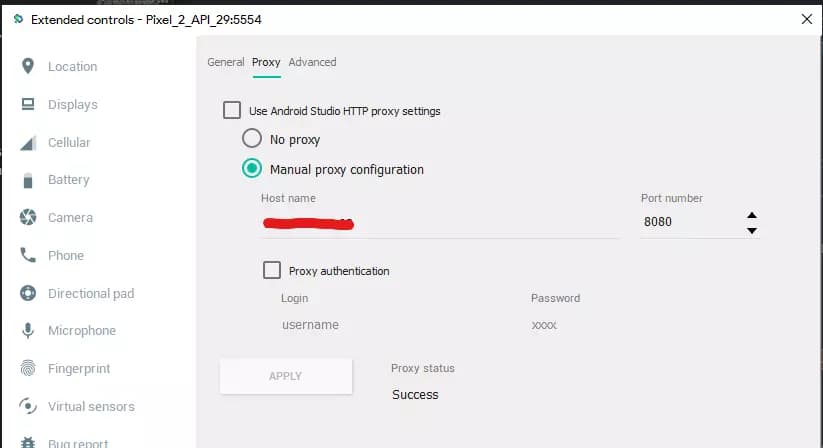
I prefer using the emulator proxy config setting because it's faster for configuration and it retains the previous configuration if you want to switch between using proxy or not. You also need to use Mobile data instead of Wi-Fi if you decided to use the emulator. To configure the proxy server:
- Open the emulator
- Go to setting by clicking the ... button on the emulator's right panel.
- Go to Setting -> Open the Proxy tab.
- Uncheck the Use Android Studio HTTP proxy settings.
- Choose Manual proxy configuration.
- Enter Host name and the Port number with the address we got previously. In this case it would be 192.168.1.100 and 8080 respectively.
- Click Apply and if it works, the Proxy status would say Success.
📝 Don't forget to use Mobile data network instead of Wi-Fi if you're using the emulator.
📝 For our changes to take effect. You need to close all running applications and toggle airplane mode on then off.
I have no idea why we have to toggle on/off the airplane mode for it to work 😕 but it's essential. If you know why, let me know 😃.
Installing mitmproxy Certificate
Ok, now we are almost done. This is a one-time setup only per proxy server. You don't need to do this again if you have already done this step. But, if you change the proxy server machine, you need to do this again. The last thing we need to do is install the user certificates:
- Open a browser app on the emulator.
- Enter and visit mitm.it.
- Choose Android.
- For Certificate name type in mitm ca. The certificate name doesn't matter what you type in.
- Click Ok. You may need to set up a device pin for security reasons.
Inspecting the Network Traffic
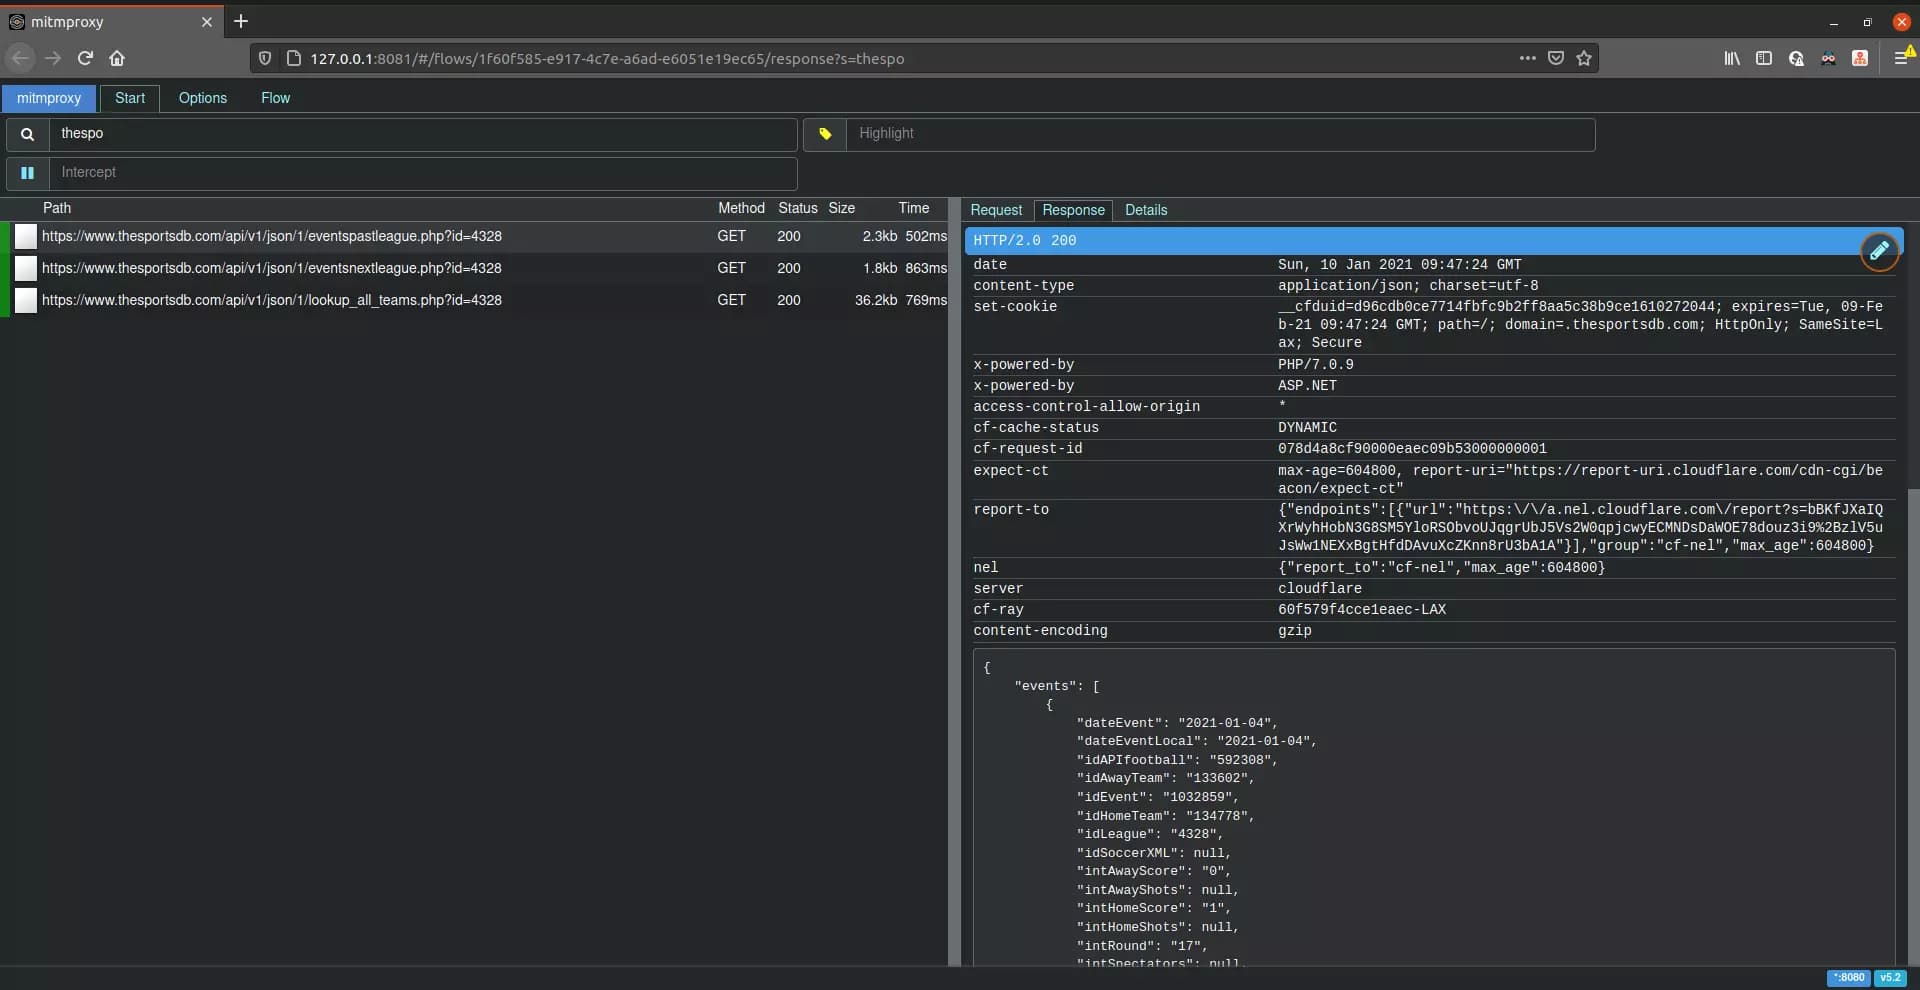
After we finished connecting to the proxy server, visit the webserver IP address we got previously when starting up the proxy server on our laptop/PC browser. In this case, it's 127.0.0.1:8081. As we navigate through the app, the network traffic will be recorded and listed on the page. You can inspect each request detail by clicking on it.
Keyboard Shortcuts
Keyboard shortcut/s I know:
- Z: Clear network traffic list.
Command Tips
If you run the command with just mitmweb, you probably have noticed something weird happened. The network connection is failing on the other apps downloaded from the Playstore or signed APK you installed. That's because, as I stated previously that the inspection only works in debug APK with defined network configurations on the manifest file like above.
Can we inspect network traffic on a specific domain or host and ignore the others? Well, of course you can. You can provide an argument for mitmweb command to ignore hosts based on the RegEx pattern you provide. Through negative lookahead expressions we can achieve that:
# Ignore everything but thesportsdb.com/net and its subdomain
mitmweb --ignore-hosts '^(?![0-9\.]+:)(?!([^\.:]+\.)*thesportsdb\.(com|net):)'
Learn more how to ignore domains.
What's next?
I know it's a bit complicated to set this up but, the benefits are worth it. Next, I will tell you how to modify request or response with mitmproxy Addons.