My journey into homelab and how I ended up self-hosting almost everything I run.
How I Got Started
It started around June 2025. I had a Telegram bot I wanted to keep running 24/7 — a little game called This or That where users pick between two options. I needed a machine accessible from the internet around the clock. My laptop could technically do it, but leaving it on all the time isn't sustainable.
So I turned to Railway. It's a great platform — easy deploys, flexible pricing, and you get $5 in monthly credits on their cheapest plan. For a single app it's fine. But as I started hosting more experiments, the bill crept above $5, and the machine specs weren't great for running multiple services simultaneously.
That's when I came across the Homelab community. The idea clicked immediately: instead of renting compute from a cloud provider, why not own a machine that sits at home, runs 24/7, and costs almost nothing in electricity? My goal wasn't commercial — I just wanted a reliable place to deploy and experiment with apps that I could also reach from the internet.
The Device: Beelink S12 Pro
After researching online and talking it through with AI, I landed on the Beelink S12 Pro with an Intel N100 processor. It's a compact mini PC originally marketed for home office and media streaming, but it's more than capable as a homelab machine.
| Component | Spec |
|---|---|
| CPU | Intel N100 (12th Gen, 4 cores) |
| RAM | 16GB DDR4 |
| Storage | 1TB NVMe SSD |
| Pre-installed OS | Windows 11 |
What I love about it: it's completely silent and sips power. The N100 has a TDP of around 6W under typical load, which translates to roughly 4.3 kWh a month running 24/7. At Singapore's electricity rate of ~SGD $0.33/kWh, that's about SGD $1.43/month — compared to what I was spending on Railway. The upfront cost was SGD $320 from Lazada, which paid for itself within a few months.
OS Choice: Why Debian
The Beelink ships with Windows 11, but that wasn't going to work for me. I wanted to run this machine headlessly — no monitor, no keyboard, just SSH into a terminal when I need it. Windows is fine for desktop use, but I've never been comfortable with PowerShell and it adds a lot of overhead for server workloads.
I went with Debian. After researching and consulting with AI, Debian kept coming up as the battle-tested choice for server workloads: stable, minimal, massive community support, and it's the upstream base for many other Linux distributions. The initial OS installation still required hooking up a monitor just once, but after that setup I never needed it again.
Here are the key things I configured right after installing:
Creating a non-root user — Running everything as root is dangerous. Every command has unrestricted access to the entire system, so one wrong command can wipe your setup. Creating a dedicated user and granting it sudo access means you only elevate privileges when you explicitly need to.
SSH key-only authentication — SSH keys use asymmetric cryptography: your private key stays on your machine, the public key lives on the server. When you connect, the server verifies you hold the matching private key without it ever crossing the network. Far more secure than typing a password.
Disabling password auth and root login — Once SSH keys are in place, password authentication is just an attack surface. Automated bots constantly scan the internet trying to brute-force SSH logins. Disabling passwords makes those attacks completely useless. Disabling direct root login adds another layer — even if someone finds a way in, they can't immediately act as root.
Connecting Remotely with Tailscale
With Debian set up, the next problem was: how do I access this machine from anywhere without exposing it directly to the internet?
Tailscale is a zero-config mesh VPN built on WireGuard. You install it on each device, and it creates a private network — called a tailnet — connecting them all securely, regardless of where they are. My laptop and my Beelink both joined the same tailnet, so I can SSH into my homelab from anywhere as if I were on the same local network. No port forwarding, no firewall rules, no exposing anything to the public internet.
Going Headless
I briefly touched on this earlier — the reason I went headless is simple: I got tired of switching my monitor cable back and forth between my MacBook and the Beelink. A headless machine is one that runs without a locally connected monitor, keyboard, or mouse. Everything is managed remotely over the network via SSH or web interfaces.
The benefits are immediate: the Beelink now lives tucked in a corner, silent and out of the way. I can access it from my laptop from anywhere, and even from my Android phone via Termux. Less clutter, more flexibility.
Vim and Neovim
Going headless forced me to get comfortable with a terminal text editor. In a GUI-less environment, you can't just open VS Code — you need something that runs in the terminal. That's where Vim (and eventually Neovim) came in.
The learning curve was steep. I kept forgetting shortcuts or getting stuck in modes. But I took a gradual approach — I didn't rip out all my editors on day one. I started by installing the Vim plugin in Cursor (my IDE at the time, a VS Code fork), and then in Android Studio. That way I was building up the muscle memory in an environment where I already knew the codebase. Over time it clicked, and now I use Vim mode in every editor I touch.
The thing that sold me on Vim was Vim motions — keyboard shortcuts with semantic meaning that compose together. Once it's internalized, navigating and editing text becomes remarkably fast. A few examples:
- vi{ — select the contents inside {}
- va{ — select contents including the braces themselves
- di{ — delete the contents of {} without removing the braces
- ci{ — replace the contents of {} (drops you into insert mode)
That's just one pattern — the same logic applies to (, [, ", ', HTML tags, and more. There are so many combinations; this is just the tip of the iceberg.
For the terminal I'm using Neovim as my primary editor, mainly for its plugin ecosystem. My favorite is Telescope — a fuzzy finder that lets you jump to any file instantly. You can also customize the theme to match your setup.
That said, I haven't ditched other editors. Android Studio is still my go-to for mobile development, and Zed for general editing — both with Vim mode enabled.
Containerization with Docker
I had some prior experience with Docker from working on an app core team, where I dealt with CI/CD pipelines and containerized environments. So this wasn't a foreign concept. But the homelab gave me a reason to go much deeper.
Containerization packages an app and all its dependencies into an isolated, portable unit. The big win for a homelab is consistency — every app runs in its own container with no conflicts, and I can spin things up or tear them down without touching the host system.
The real game-changer was Docker Compose. Instead of running individual docker run commands, I define an entire stack — app, database, reverse proxy — in a single docker-compose.yml file and bring it up with one command. My whole homelab runs this way.
Uniform Terminal Across Machines
Since the terminal is my primary interface, I want my shell environment to feel identical whether I'm on my MacBook or SSHed into the Beelink. Aliases, configs, Neovim setup — all of it.
I use Chezmoi to manage my dotfiles. It backs them up to a git repository and applies them consistently on any machine. I wrote a separate post on this setup which you can read here.
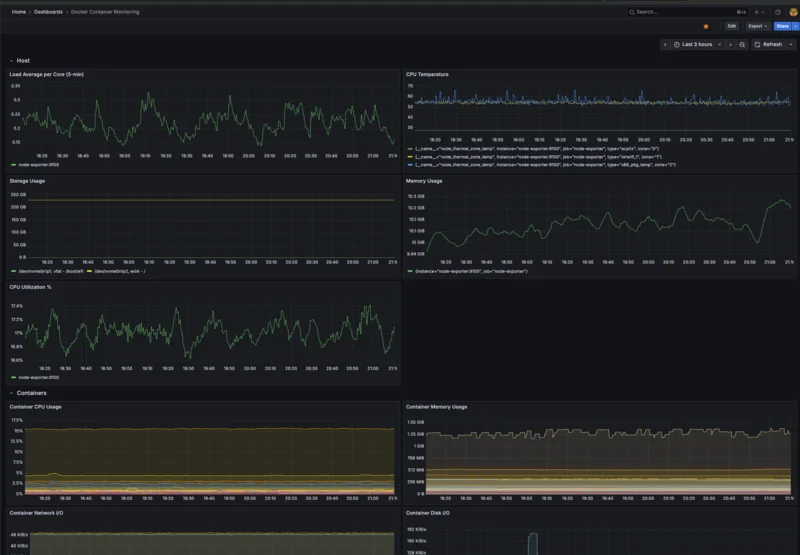
Monitoring with Grafana
When I was on Railway, metrics came built-in — CPU, memory, network, all visible in the dashboard. Moving to a self-hosted machine meant I had nothing out of the box. I needed to build my own visibility.
I set up a monitoring stack with Grafana, running entirely in Docker Compose with a lot of AI help to piece it together. Here's how the components fit together:
- cAdvisor — runs alongside your containers and collects real-time resource metrics (CPU, memory, network) per container
- Prometheus — scrapes those metrics from cAdvisor and stores them as time-series data
- Loki — collects and stores log output from all Docker containers
- Grafana — queries both Prometheus and Loki, and visualizes everything in a single dashboard
Getting the queries right was the trickiest part — here's what I ended up using if you want to replicate it.
Host metrics
Load Average per Core (5-min)
How busy the CPU cores actually are on average. Dividing by core count keeps it normalized — 1.0 means fully loaded, anything above means work is queuing up.
node_load5 / on(instance) count by (instance) (node_cpu_seconds_total{mode="idle"})
Storage Usage
How much of the disk is actually used. The filter excludes tmpfs (RAM-backed, not real disk) and squashfs (snap packages) so the number reflects actual storage.
node_filesystem_size_bytes{fstype!~"tmpfs|squashfs"} - node_filesystem_avail_bytes{fstype!~"tmpfs|squashfs"}
CPU Utilization
How hard the CPU is working, averaged across all cores. Simple and direct — 100% means fully maxed out.
100 - (avg by(instance) (rate(node_cpu_seconds_total{mode="idle"}[5m])) * 100)
CPU Temperature
Temperature readings from the CPU's thermal sensors. I added this after wondering whether the machine was running too warm — turns out it runs cool.
node_thermal_zone_temp
Memory Usage
How much RAM is actually in use. Averaged over 5 minutes so the graph doesn't jump around with every short-lived spike.
avg_over_time(node_memory_MemTotal_bytes[5m]) - avg_over_time(node_memory_MemAvailable_bytes[5m])
Container metrics
CPU Usage
CPU usage broken down per container. The filter keeps it to my Compose services only — otherwise internal Docker containers clutter the graph.
rate(container_cpu_usage_seconds_total{container_label_com_docker_compose_service!=""}[5m]) * 100
Network I/O
How much data each container is sending and receiving. Handy when something is eating bandwidth and you're not sure what.
# receive
rate(container_network_receive_bytes_total{container_label_com_docker_compose_service!=""}[5m])
# transmit
rate(container_network_transmit_bytes_total{container_label_com_docker_compose_service!=""}[5m])
Memory Usage
Memory usage per container. Good for spotting when something is slowly eating more RAM than it should.
container_memory_usage_bytes{container_label_com_docker_compose_service!=""}
Disk I/O
How much each container is reading from and writing to disk. One container doing heavy writes can slow everything else down, so good to keep an eye on.
# read
rate(container_fs_reads_bytes_total{container_label_com_docker_compose_service!=""}[5m])
# write
rate(container_fs_writes_bytes_total{container_label_com_docker_compose_service!=""}[5m])
I also set up alerting rules — if memory usage crosses a threshold, or a container goes down unexpectedly, I get notified via webhook.
Cronjob with Cronicle
Some homelab tasks need to run on a schedule — periodic backups, cleanup scripts, that sort of thing. Debian has a built-in cron daemon that technically handles this, but it has zero observability. You schedule a job, it runs in the background, and if it silently fails you'll probably never know.
I switched to Cronicle, which adds a web UI on top of scheduled task management. You can see run history, log output for each execution, success/failure status, and configure webhooks that fire when a job fails. I have it set up to email me whenever a scheduled task fails so I'm always aware and can act on it.
Homelab Apps
Beyond the Telegram bot that started all this, here are a few other things running on my machine.
Pi-hole
A network-wide ad blocker that acts as a DNS sinkhole — it intercepts DNS queries and drops requests to known ad and tracking domains before they even load. What makes it different from a browser extension is that it works for every device on your network: phone, TV, laptop, all of them. The aggressive ads that some sites try to sneak past you just don't load. Genuinely a quality-of-life improvement.
LobeHub
My favorite self-hosted app. It's an open-source AI agent framework that lets you manage and organize AI agents, each configured for a specific function. I have agents set up for different workflows, and I use OpenRouter to experiment with different LLM providers without being locked into one. It's flexible enough to mix and match models depending on the task.
I'll write a dedicated post on LobeHub setup — there's a lot to cover there.
Jupyter Notebook
My personal scratch pad. It's a browser-based interactive computing environment where you can write and run code immediately, with output rendered inline. I use it when I want to quickly test an idea or try out a library without setting up a full project. What makes it interesting for me is the multi-language support — I'm not just running Python. I also have kernels set up for JavaScript (via Deno), Go, Kotlin, and Rust. It's like having a portable REPL for any language, accessible from any browser.
Managing Backups
With a homelab comes the responsibility of managing your own backups. I learned this the hard way after realizing that none of my data had any redundancy.
I started with borgmatic, but the configuration grew complex and confusing over time. After looking around for alternatives, I landed on Restic + Rclone + Cloudflare R2 — and this combination has been solid.
Restic
Restic handles the backup itself. It does incremental, encrypted backups with a clean CLI — straightforward to set up and reason about.
Rclone
Rclone acts as the bridge to cloud storage, translating between Restic and any S3-compatible backend. Restic supports remote repositories via Rclone, so swapping storage providers later is just a config change.
Cloudflare R2
Cloudflare R2 is the storage backend — S3-compatible, fast, and crucially, the free tier is generous:
| Free tier | |
|---|---|
| Storage | 10 GB / month |
| Class A Operations | 1 million requests / month |
| Class B Operations | 10 million requests / month |
| Egress | Free |
For each project I have a dedicated backup folder with a backup.sh and a restore.sh. The scripts are mostly the same shape — they just differ in which directories to include and how to mount the data. Running a restore is as simple as calling the restore script and pointing it at the snapshot you want.
Exposing Apps to the Internet
My Telegram bot needs a public HTTPS URL for Telegram to send webhook events to. That means my local service has to be reachable from the internet, which creates a problem: my Beelink sits behind a home router with no public IP.
I've used two different approaches for this.
Cloudflare Tunnel
The free option. You install a cloudflared agent on your machine, it opens an outbound tunnel to Cloudflare's edge, and Cloudflare routes public traffic back through it. No public IP needed, no port forwarding. It just works. A few limitations to be aware of on the free tier:
- HTTP/HTTPS only — no raw TCP or UDP tunneling
- Traffic is routed through Cloudflare's network, so latency depends on their infrastructure
- 100MB WebSocket message size limit
- No SLA guarantees
Pangolin
The self-hosted alternative. It's an open-source tunneled reverse proxy — similar concept but you control the exit node. I spun up the cheapest AWS EC2 instance, deployed Pangolin on it, and configured it as a reverse proxy routing traffic to my homelab services. The web UI makes managing routes straightforward, and it handles SSL/TLS certificates via Let's Encrypt automatically, which is convenient.
Lessons Learned
This whole journey taught me a lot — Linux, containers, networking, monitoring. And genuinely, I've enjoyed every bit of it. That said, here's what I'd do differently if I were starting over:
Set up backups from day one. It's always the thing you push off until something goes wrong. Don't wait.
Document your Docker Compose configs as you go. Three months later you won't remember why you mounted that specific volume or what that environment variable does. A few comments in the YAML file save a lot of head-scratching later.
Start monitoring early. You want baseline metrics before something breaks — not after. Without a baseline you don't know what "normal" looks like.
Don't over-engineer early. I resisted the urge to add Kubernetes and multi-node clustering right away, and that was the right call. Get comfortable with the basics first. Add complexity only when you have a real reason.
What's Next
There's no shortage of directions to go from here. A few things I'm curious about:
k3s / Kubernetes
The most obvious gap in my current setup is that the Beelink is a single point of failure. If it dies, everything goes down. Exploring k3s (a lightweight Kubernetes distribution) across a couple of nodes would add some resilience — though I'm in no rush.
Home Assistant
I'm also interested in home automation. There are some fun ideas in that space: having your air conditioning turn on automatically when you're close to home, or lights that adjust based on time of day. Small things that make the homelab feel more useful beyond just hosting apps.
OpenClaw
OpenClaw is an open-source, locally-running autonomous AI agent — the kind that can plan and execute multi-step tasks on your machine. Running it on the homelab is a natural fit: you get a persistent, always-on agent with full control over what it can access — though you still rely on an external LLM provider, so API costs and data leaving your network are still part of the picture. Something I want to explore properly.
Conclusion
I started this journey looking for a cheaper alternative to Railway and ended up with a full self-hosted setup that costs less than SGD $2 a month to run — after a one-time hardware investment of SGD $320. But the real value wasn't the cost savings. It was the hands-on learning across Linux, Docker, networking, monitoring, and everything in between.
If you're on the fence about setting up a homelab, my honest advice is: just start. You don't need expensive hardware. A mini PC like the Beelink, a Raspberry Pi, or even an old laptop is enough to get going. The learning curve is real, but so is the payoff.
I'll be writing more about specific parts of this setup — LobeHub and more. If any section here was interesting, those posts will go deeper.
Did you find this helpful?