The terminal is where developers spend a significant portion of their time, yet many of us stick with the default shell configuration. If you're still using the basic terminal setup, you're missing out on a world of productivity enhancements. Enter Oh-My-Zsh - a delightful, open-source framework for managing your Zsh configuration that can transform your command line experience from mundane to magical.
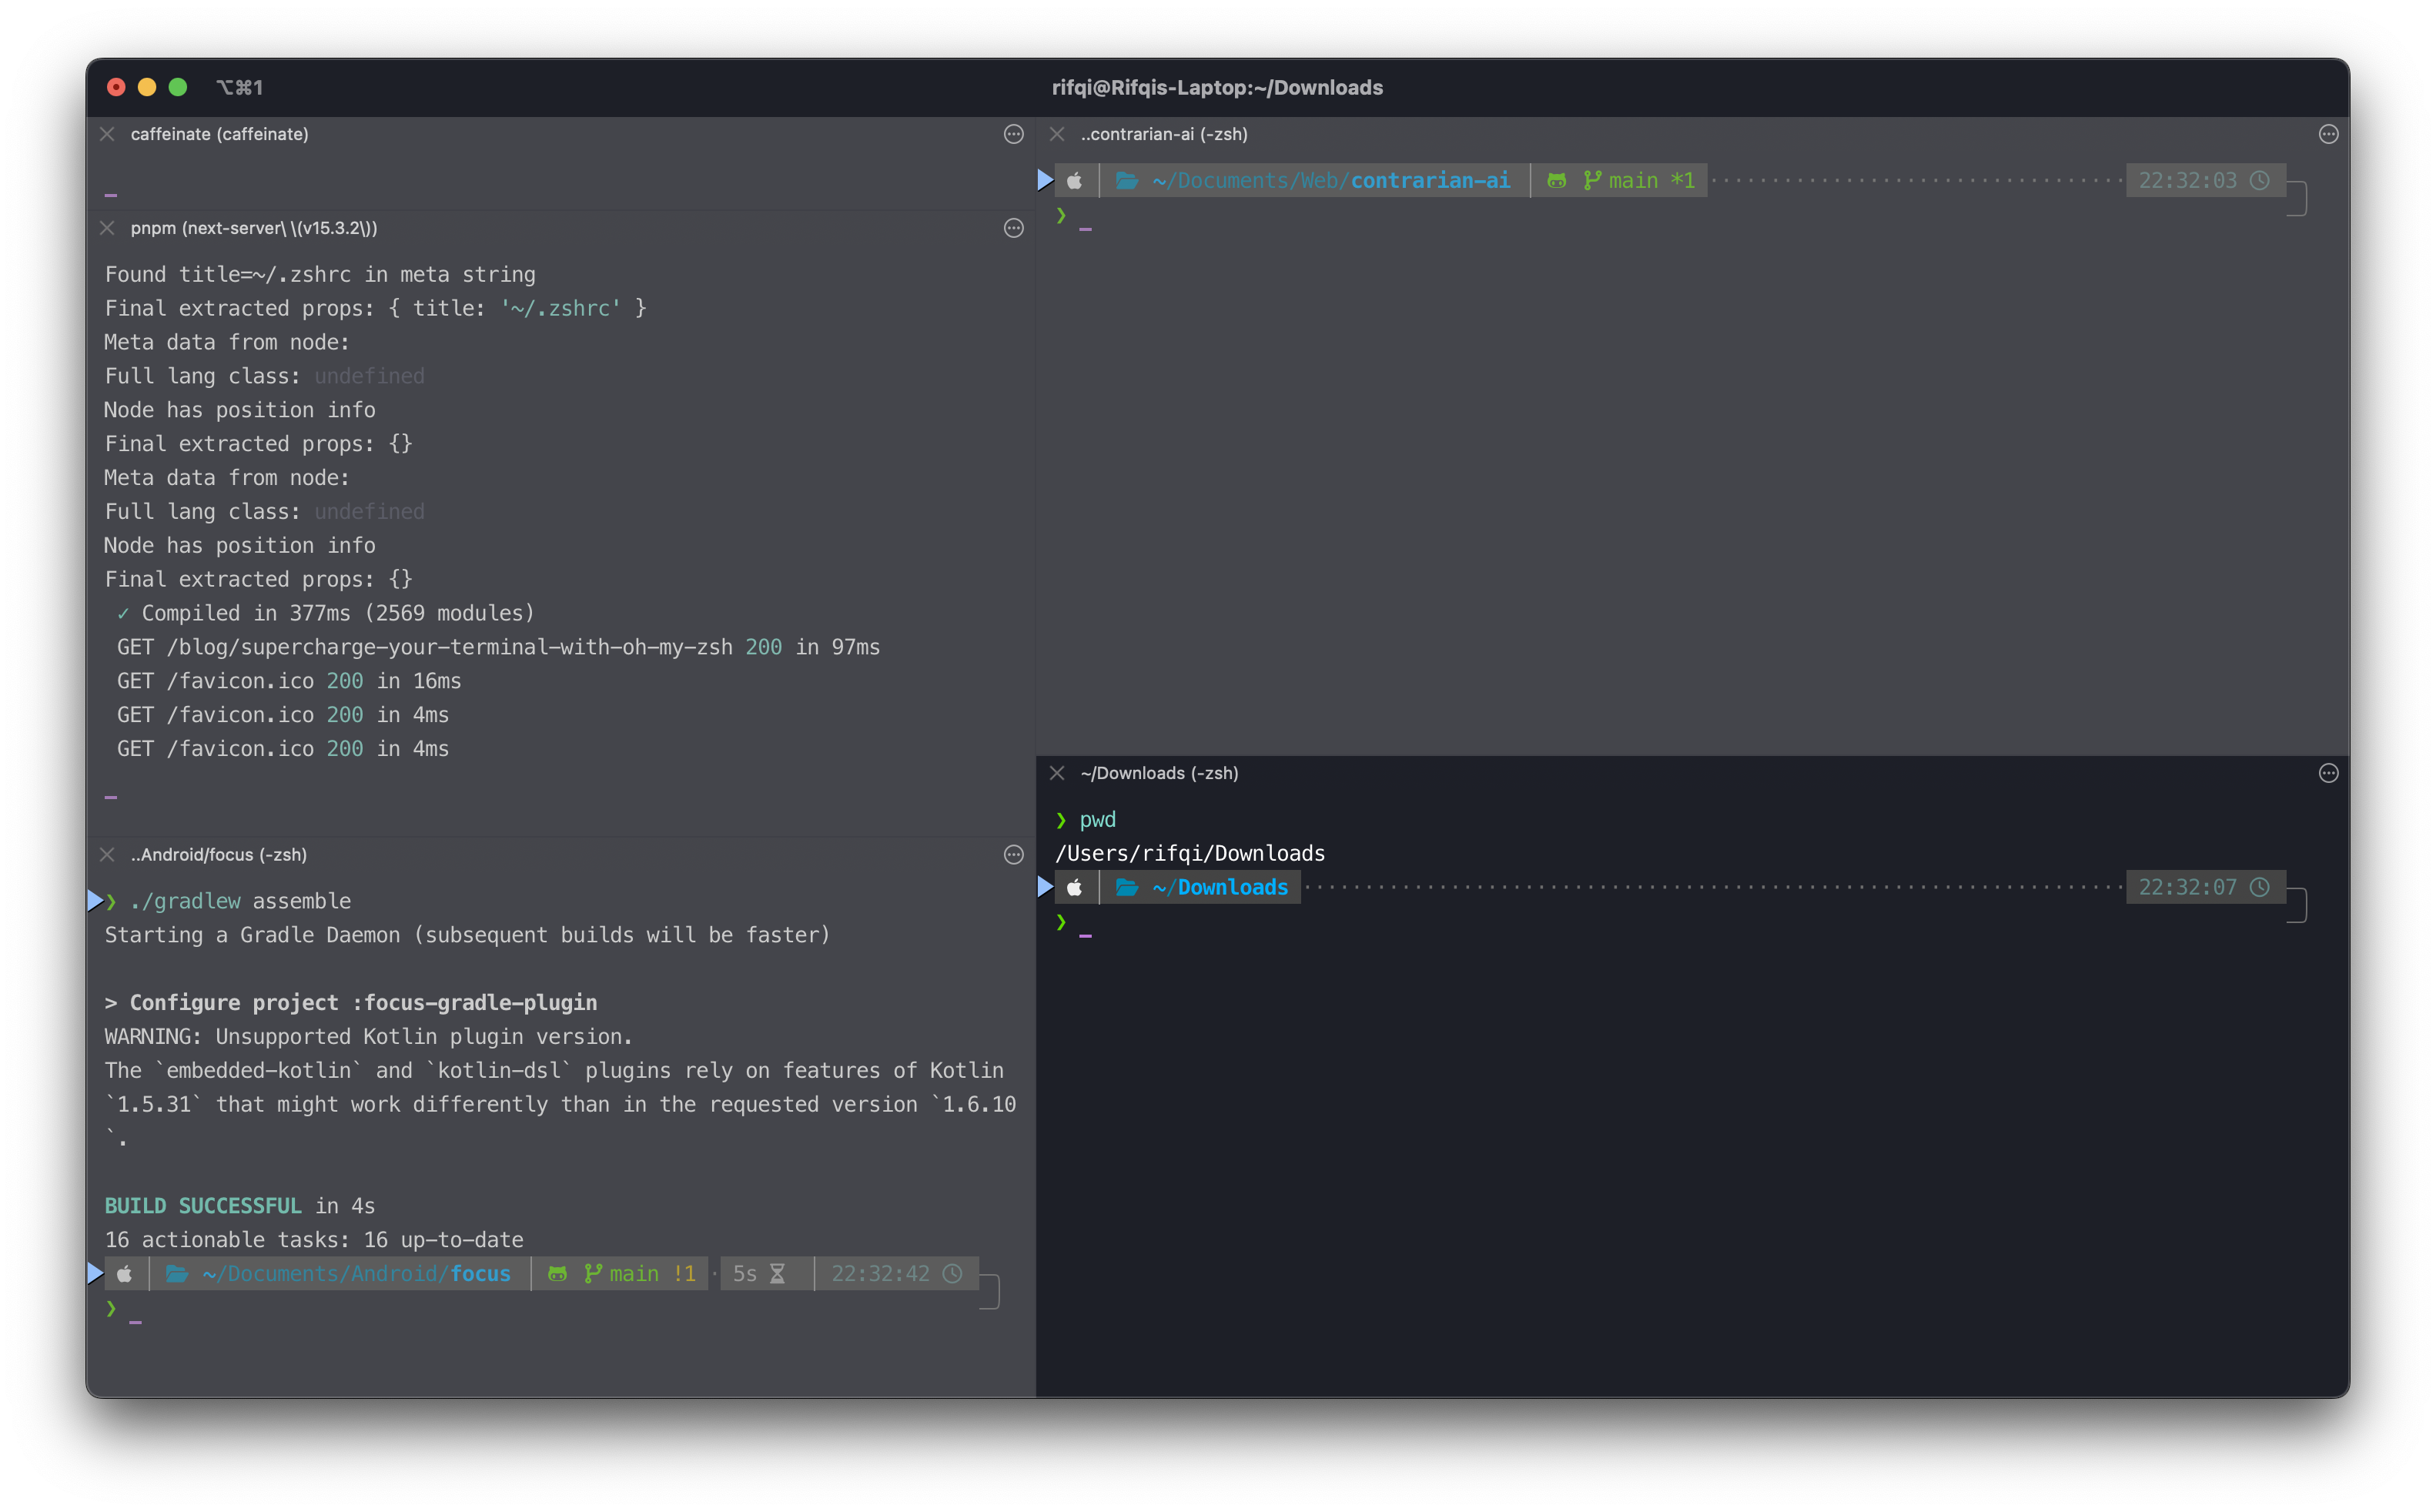
I will show you how to update your terminal from this:

to this:
What is Oh My Zsh?
Oh My Zsh is a community-driven framework for managing your Zsh configuration. It bundles thousands of helpful functions, plugins, themes, and a few things that make you shout "Oh My ZSH!" when you realize how much time you've been wasting without it.
Built on top of the Z shell (Zsh), which is now the default shell on macOS, Oh My Zsh provides:
- 200+ optional plugins (rails, git, macOS, hub, docker, homebrew, node, php, python, etc)
- Over 140 themes to spice up your morning, afternoon, or evening
- Auto-completion that actually works
- Smart aliases and functions
- Easy customization without touching complex configuration files
Installation: Getting Started
Before installing Oh My Zsh, make sure you have Zsh installed (which comes pre-installed on macOS Big Sur and later).
Quick Installation
The easiest way to install Oh My Zsh is via curl or wget:
# Via curl
sh -c "$(curl -fsSL https://raw.github.com/ohmyzsh/ohmyzsh/master/tools/install.sh)"
or
# Or via wget
sh -c "$(wget https://raw.github.com/ohmyzsh/ohmyzsh/master/tools/install.sh -O -)"
The installation script will:
- Clone the Oh My Zsh repository to ~/.oh-my-zsh
- Back up your existing ~/.zshrc file
- Create a new ~/.zshrc with the Oh My Zsh template
- Change your default shell to Zsh (if it isn't already)
Themes: Making Your Terminal Beautiful with Powerlevel10k
One of the most immediately noticeable improvements Oh My Zsh brings is visual enhancement through themes. Themes control how your prompt looks and what information it displays. Powerlevel10k is the ultimate theme. It's a theme that is highly customizable and has a lot of features.
Option 1: With Oh My Zsh
# Install Powerlevel10k
git clone --depth=1 https://github.com/romkatv/powerlevel10k.git "${ZSH_CUSTOM:-$HOME/.oh-my-zsh/custom}/themes/powerlevel10k"
Set the theme in your ~/.zshrc file:
# Set theme in ~/.zshrc
ZSH_THEME="powerlevel10k/powerlevel10k"
Start a new terminal session and run the following command to configure the theme:
# Run the configuration wizard
p10k configure
The configuration wizard will prompt you multiple style options to customize your theme. You can choose to use the default settings or customize it to your liking.
You can re-run the configuration wizard anytime to update your theme.
Tips Before Running the Configuration Wizard
It is recommended that you install the custom font first before running the configuration wizard. So that your terminal support rich characters and icons.
I recommend the Nerd Fonts. You can download it from their website
More details on how to install the font on the section below on Installing Nerd Fonts.
Essential Plugins for Developers
Plugins are where Oh My Zsh truly shines. They add functionality, shortcuts, and smart completions for various tools and frameworks.
Must-Have Plugins
Enable plugins by adding them to the plugins array in your ~/.zshrc. These are some of the plugins that I use:
plugins=(
  git
  zsh-autosuggestions
  zsh-syntax-highlighting
)
There are more plugins recommended by the community. For example:
plugins=(
  git
  docker
  npm
  vscode
  macos
  web-search
  history-substring-search
  zsh-autosuggestions
  zsh-syntax-highlighting
)
Let's explore some essential plugins functionality:
git - Provides hundreds of aliases and functions for git:
- gst → git status
- gaa → git add --all
- gcmsg → git commit -m
- gp → git push
zsh-autosuggestions (require separate installation) - Suggests commands as you type based on your history. Press → to accept.
To install it, you can run the following command:
git clone https://github.com/zsh-users/zsh-autosuggestions ${ZSH_CUSTOM:-~/.oh-my-zsh/custom}/plugins/zsh-autosuggestions
zsh-syntax-highlighting (requires separate installation) - provides fish-like syntax highlighting for Zsh.
git clone https://github.com/zsh-users/zsh-syntax-highlighting.git ${ZSH_CUSTOM:-~/.oh-my-zsh/custom}/plugins/zsh-syntax-highlighting
docker - Auto-completion for Docker commands and useful aliases:
- dps → docker ps
- dex → docker exec -it
- dim → docker images
web-search - Search the web from your terminal:
- google "Oh My Zsh" - Opens Google search
- stackoverflow "zsh plugin" - Searches Stack Overflow
Configuration Tips and Best Practices
Organizing Your .zshrc
Keep your ~/.zshrc organized with comments:
# Oh My Zsh Configuration
export ZSH="$HOME/.oh-my-zsh"
ZSH_THEME="agnoster"

# Plugins
plugins=(
  git
  docker
  node
  zsh-autosuggestions
  zsh-syntax-highlighting
)

source $ZSH/oh-my-zsh.sh

# Custom aliases
alias ll='ls -alF'
alias la='ls -A'
alias l='ls -CF'

# Custom functions
function mkcd() {
  mkdir -p "$@" && cd "$_";
}

# Environment variables
export EDITOR='cursor'
export PATH="$HOME/.local/bin:$PATH"
Custom Aliases and Functions
Some of the aliases that I use:
# Directory navigation
alias ..='cd ..'
alias ...='cd ../..'
alias ....='cd ../../..'

# System shortcuts
alias update='brew update && brew upgrade'
alias myip='curl http://ipecho.net/plain; echo'

# Development shortcuts
alias json='python3 -m json.tool'
Installing Nerd Fonts
The default terminal font doesn't support rich characters and icons. There are a lot of options out there, one of my favorite is Nerd fonts. It will help you to have support rich characters and icons in your terminal. The installation is pretty straightforward:
- I am using the Meslo Nerd Font for the terminal specifically MesloLGLDZ Nerd Font Regular. You can download it from their website here.
- Once downloaded, you can install the font by drag-and-drop the font file to the Font Book app.
- Depending on your terminal application, you need to set the font to the font you installed.
- For example, if you are using iTerm2, you can set the font to the font you installed in the iTerm2 > Settings > Profiles > Text section.
- If you are using the default terminal, you can set the font to the font you installed in the Terminal > Settings > Profiles > Text section.
You can then run or re-run the p10k configure command to configure your theme with the new font.
Keeping Oh My Zsh Updated
Regular updates ensure you get the latest features and bug fixes:
# Update Oh My Zsh
omz update

# Update plugins (if installed via git)
cd ~/.oh-my-zsh/custom/plugins/zsh-autosuggestions
git pull

cd ~/.oh-my-zsh/custom/plugins/zsh-syntax-highlighting
git pull
iTerm2: The Ultimate Terminal Emulator for macOS
While Oh My Zsh enhances your shell experience, pairing it with iTerm2 takes your terminal to the next level. iTerm2 is a powerful terminal emulator for macOS that offers features far beyond what the default Terminal app provides.
Why iTerm2?
One of my favorite features on iTerm2 is the ability to split panes. It allows you to have multiple terminal sessions side by side. It is very useful when you are working on multiple projects. You dont have to switch between tabs to see the output of different commands, it keeps everything in one place.
Other than split panes, iTerm2 also offers:
- Rich Text Support: Better font rendering and color support for themes like Powerlevel10k
- Advanced Search: Search through your terminal history with regex support
- Customizable Profiles: Create different profiles for different projects or environments
- Hotkey Window: Global hotkey to instantly show/hide your terminal
- Mouse Support: Click and drag, copy/paste with mouse
- 256 Color Support: Perfect for colorful themes and syntax highlighting
Installing iTerm2
Option 1: Direct Download Visit iterm2.com and download the latest stable release.
Option 2: Using Homebrew (Recommended)
# Install iTerm2 via Homebrew
brew install --cask iterm2
Essential iTerm2 Configuration
After installing iTerm2, configure it for the best Oh My Zsh experience:
1. Set Up Your Font
- Go to iTerm2 > Settings > Profiles > Text
- Change font to a Nerd Font we just installed above.
- Set font size to 12-14pt for optimal readability.
2. Configure Colors
- Go to iTerm2 > Settings > Profiles > Colors
- Import a color scheme like "Solarized Dark" or "Dracula"
- Or let Powerlevel10k handle colors automatically
Power User Features
Split Panes
- Horizontal split: Cmd+D
- Vertical split: Cmd+Shift+D
- Navigate between panes: Cmd+[ or Cmd+]
Hotkey Window
- Set up a global hotkey (like Cmd+`) to instantly show/hide iTerm2
- Perfect for quick terminal access without losing focus
Search and Navigation
- Cmd+F: Search through terminal output
- Cmd+;: Autocomplete from terminal history
- Cmd+Shift+H: View command history
The Perfect Combination: iTerm2 + Oh My Zsh + Powerlevel10k
When you combine iTerm2 with Oh My Zsh and Powerlevel10k, you get:
- Beautiful, informative prompts with git status, execution time, and system info
- Rich color support that makes themes truly shine
- Split panes for monitoring logs while developing
- Smart autocompletion with visual feedback
- Efficient workflow with customizable shortcuts and profiles
Bonus: Handy Terminal Commands
To further supercharge your terminal experience, here are some modern command-line tools that work beautifully with your oh-my-zsh and iTerm2 setup:
File and Text Operations
bat - A cat clone with syntax highlighting and Git integration
# Install via Homebrew
brew install bat

# Usage examples
bat file.js                    # View file with syntax highlighting
bat -n file.py                 # Show line numbers
cat file.txt | bat -l json     # Pipe content and set language
fd - A simple, fast alternative to find
brew install fd

# Usage examples
fd pattern                     # Find files/directories matching pattern
fd -e js                      # Find all .js files
fd -t f pattern               # Find only files (not directories)
fd pattern ~/Projects         # Search in specific directory
ripgrep (rg) - Ultra-fast text search
brew install ripgrep

# Usage examples
rg "function"                 # Search for "function" in current directory
rg -t js "const"             # Search only in JavaScript files
rg "TODO" --ignore-case      # Case-insensitive search
rg "pattern" -A 3 -B 3       # Show 3 lines before and after matches
Interactive Tools
fzf - Command-line fuzzy finder (one of my favorite) - jumping through files and directories is a breeze.
brew install fzf
$(brew --prefix)/opt/fzf/install  # Install shell integration

# Usage examples
history | fzf                 # Fuzzy search command history
find . -type f | fzf         # Fuzzy search files
git log --oneline | fzf      # Fuzzy search git commits
zoxide - Smarter cd command that learns your habits
brew install zoxide

# Add to your .zshrc
eval "$(zoxide init zsh)"

# Usage (after visiting directories a few times)
z projects                   # Jump to ~/Projects or similar
z doc                       # Jump to ~/Documents
zi                          # Interactive directory selection
System Monitoring
htop - Interactive process viewer
brew install htop
htop                        # Better alternative to top
dust - More intuitive version of du
brew install dust
dust                        # Show directory sizes in current path
dust -r                     # Reverse order (largest first)
duf - Better df alternative
brew install duf
duf                         # Show disk usage with colors and graphs
Quick Setup Script
Add these aliases to your ~/.zshrc for quick access:
# Modern alternatives
alias cat='bat'
alias find='fd'
alias grep='rg'
alias ls='eza --icons'        # eza is another great ls alternative
alias cd='z'                  # Use zoxide instead of cd

# Quick shortcuts
alias lg='lazygit'
alias ll='eza -la --icons --git'
alias tree='eza --tree --icons'
Pro Tips
- Combine tools: fd .js | fzf | xargs bat - Find JS files, select with fzf, view with bat
- Use with oh-my-zsh: Many plugins work great with these tools (especially fzf)
- Set up key bindings: fzf provides Ctrl+R for history and Ctrl+T for file search
- Customize: Most tools support configuration files for personal preferences
These tools integrate seamlessly with your oh-my-zsh setup and will make your terminal workflow even more powerful and enjoyable!
Keep Your Setup Synced Across Machines
Once you've crafted the perfect terminal setup, you'll want to preserve it. The next challenge is keeping it consistent across multiple machines — a work laptop, a personal machine, a VPS, or even your phone via Termux.
That's where Chezmoi comes in. It tracks your dotfiles (.zshrc, your plugin configs, aliases, and more) in a Git repository so you can sync everything to a new machine in minutes instead of hours.
Conclusion
Combining Oh My Zsh with iTerm2 transforms your terminal from a basic command line interface into a powerful, personalized development powerhouse. Together, they create an environment that's not just functional, but genuinely enjoyable to work in.
What you've gained with this setup:
- Visual Excellence: Beautiful themes with proper font support and rich colors
- Enhanced Productivity: Smart autocompletion, useful aliases, and split-pane workflows
- Professional Workflow: Advanced search, hotkey access, and customizable profiles
- Developer-Friendly Features: Git integration, syntax highlighting, and framework-specific shortcuts
The key to mastering this powerful combination is gradual adoption:
- Start with the foundations: Install iTerm2 and Oh My Zsh
- Configure your theme: Set up Powerlevel10k with proper fonts
- Add essential plugins: Begin with git, autosuggestions, and syntax highlighting
- Customize your workflow: Create aliases, shortcuts, and development profiles
- Explore advanced features: Split panes, search capabilities, and specialized plugins
Your future self will thank you for the time invested in setting up this comprehensive terminal environment. The productivity gains from better auto-completion, visual feedback, efficient navigation, and streamlined workflows will compound over time, making your development experience not just more productive, but genuinely more enjoyable.
Did you find this helpful?